Welcome to Millbrook Resort and 34 Middlerigg Lane
For your convenience please find below the Property Manual for your Luxury Retreat and important guest information on the House Rules.
We hope that you have a wonderful stay with us.
Important Guest Information, House Rules
The Resort Homes are private residences managed by Millbrook Resort, we kindly ask that all guests staying within this accommodation type respects our property owners by complying with the following requests:
-
Please remove any soiled footwear before entering the property.
-
Any spillages on soft furnishings should be reported to Reception so our housekeeping team can attend to them promptly. To avoid further damage, please do not attempt to remove stains on upholstery.
-
Most wall heating thermostats have been pre-programmed (basic instructions for increasing/decreasing heat are in the online Property Manual). If you are unsure how to adjust the settings, please contact Reception so a staff member can assist you.
Thank you and we hope that you have an enjoyable stay.
34 Middlerigg lane Property Manual
All of our Resort Homes and Luxury Retreat properties have been specifically tailored and designed to the requirements of individual owners, making your stay a unique experience. Within this manual we have included some information specific to this property, relating to the operation of various components found within the house. We would like to remind you that this is a residential area with neighbouring properties and we ask that noise levels are kept to a minimum. Should any accidental damage occur, please inform a member of staff immediately to avoid any additional charges being incurred. Thank you for your care and consideration.
PHONES
Millbrook’s Hotel system is linked to the phone/s in this property.
- The extension for this property is 5934.
- For Reception - dial 0.
- For an outside line – dial 1. Calls will be charged to your account.
- For other internal numbers, such as restaurants and the Spa, please refer to the instructions in the Millbrook compendium or dial 0 to be put through via Reception.
PRIVATE STORAGE
The owner has various cupboards and/or rooms around the property locked for private storage.
RUBBISH
There is a waste disposal unit located in the kitchen sink (in both the kitchen and scullery) where you can dispose of soft food scraps and vegetable peel. Place the items you want to dispose of down the drain, turn on the cold water tap so water is running and press the button located next to the tap to start the grinding. Press the button again to stop the machine. Please do not place chicken, fish or meat bones, banana skins or any fibrous/hard foods in the unit.
There are rubbish bins located in the cupboards of both the kitchen and scullery. Outside of the property there is a GENERAL WASTE rubbish bin (red lid) which are collected on a Monday and a GLASS BOTTLE rubbish bin (blue lid) which are collected on a Friday. Please rinse all bottles and remove any lids before disposing of them to avoid contamination.
FIRE EXTINGUISHERS
One is located in the high cupboard to the left of the sink in the scullery, another in the drawer under the indoor BBQ and another within the ski room in the garage.
- Pull the pin on the extinguisher.
- Aim the nozzle toward the base of the fire.
- Squeeze the handle to release the extinguisher agent.
- Sweep from side to side until the flames are extinguished.
If the extinguisher is emptied and the fire is still not out, evacuate the property immediately.
SMOKE ALARM
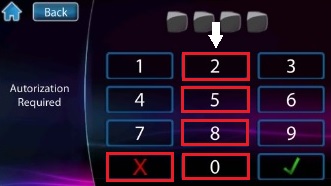
If the smoke alarm sounds for minor incidents such as burning toast, it can be disarmed by pressing the numbers on the keypad: 2, 5, 8, 0 then X. The alarm panel is located on the wall to the left as you walk through the main front foyer. DO NOT disarm the alarm if an actual fire occurs. If the fire cannot be contained using the fire extinguisher, get out of the property immediately and call 111.
FIRST AID KIT
This is located in the second drawer under the island in the main kitchen area.
LIGHTING & BLINDS
There are various automated blinds throughout the home. Please only use the remote controls or the lighting and blind wall panels to open/close them. If they are pulled on manually, it may damage them.
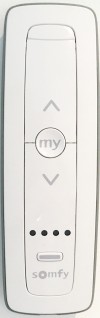
BLIND REMOTE CONTROL
Simply press the ꓥ and ꓦ arrows to open and close, and the MY button to pause/stop the process.
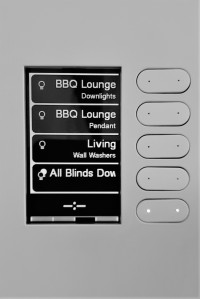
LIGHTING/BLIND WALL PANELS
These are located on the walls just before you enter the kitchen/dining area, next to the sunroom and before you enter the indoor BBQ patio area.
- Scroll using the buttons on the bottom of the panel to find the area you wish to activate.
- Push the button to the right of that zone and a small blue light will display when activated. When you switch it off, the blue light will no longer be illuminated.
HEATING
UNDER-FLOOR
The under-floor heating will be turned on ready for your arrival. The heating panels on the walls cannot be adjusted manually. Please contact Reception should you wish the level of heat to be adjusted in a specific area.
WALL RADIATORS
There are wall radiator heaters in each room that you can adjust to your comfort level by turning the dial on the end of each one.
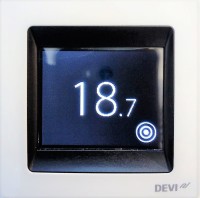
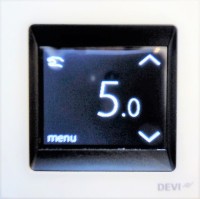
UNDER-FLOOR (BATHROOMS)
Heating is controlled separately in each bathroom. The controls are set upon your arrival, however, if you wish to change the temperature, select  then adjust the temperature using ꓥ and ꓦ.
There are also heated towel rails in each bathroom, controlled by the switch next to each one. The wall switch for the towel rail the master bathroom is located on the opposite side of the wall in the toilet.
GAS FIREPLACE (MASTER BEDROOM/BATHROOM & MAIN LIVING ROOM)
The remote control is located on the small table next to the armchair in the master bedroom, and on the coffee table in front of the TV in the main living area.
- Press to turn the gas fire on. It may take 30-60 seconds for the fire to ignite.
- Use the + and – buttons to control the temperature. And press and
 and
and  to enhance the size of the flame and the output of the fan.
- To turn off the fire, press
 again.
IMPORTANT: The glass gets very hot. Never place items close to or up against the fireplace. If you have young children in your group, a fireguard can be requested from Reception to be delivered to the property. Please always switch off the fireplace when the property is unoccupied.
COOLING
During summer months fans will be available in the bedrooms to assist with cooling. Instructions for use are as follows:
- The remote control for the fan is attached to the top (face down). Please ensure it is placed back on top of the fan after use. If there is no remote control, it can be operated manually.
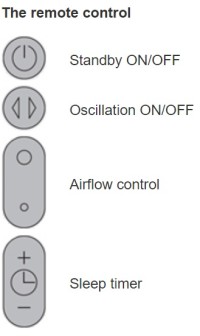
- To operate, point the remote control towards the front of the base and press the standby ON/OFF Alternatively, press the standby ON/OFF button on the main body.
- Select a high flow of air by pressing the larger circle on the remote control and a low flow of air by pressing the smaller circle.
- To oscillate the fan, press the button with the arrows.
- To set the sleep timer, select the desired time. When the time reaches zero, the appliance will go into a standby mode. To cancel, reduce the time until two dashes appear.
INDOOR PATIO AREA
BBQ
The BBQ is located behind the large double doors as you enter this area from the main dining room. The light for this area is tucked around to the very left on the interior of the cupboard. The gas is a continuous flow from underground gas mains so does not need to be turned on or off.
- Make sure all knobs are turned to the OFF position.
- To light a grill burner, push and hold the Ignition button and turn the selected burner knob to SEAR. If the burner doesn’t light within 4-5 seconds, turn the knob to OFF and wait a few minutes before trying again. If the burner fails to light, please contact Reception.
- To shut down, turn all knobs to the OFF position.
IMPORTANT: Always turn burners to OFF position when BBQ is not in use.
BBQ RANGEHOOD
- Make sure the Rangehood switch on the wall to the right of the BBQ is turned on.
- Press the top of the button on the far left to illuminate the area, and press the bottom button to turn the light off.
- Turn the fans on by pressing the top of the button and turn off by pressing the bottom of the button. HI/LO operates the strength of each fan.

OPEN FIREPLACE
If you would like this fire lit please contact Reception and someone will be sent out to do this for you. We kindly ask that the fireguard always remains in front of the fireplace when the fire is in use to avoid sparks/embers being emitted onto the floor or furniture.
KITCHEN APPLIANCES
DISH DRAWERS (KITCHEN ISLAND)
The dish drawers are located to the right of the sink. Instructions for use are as follows:
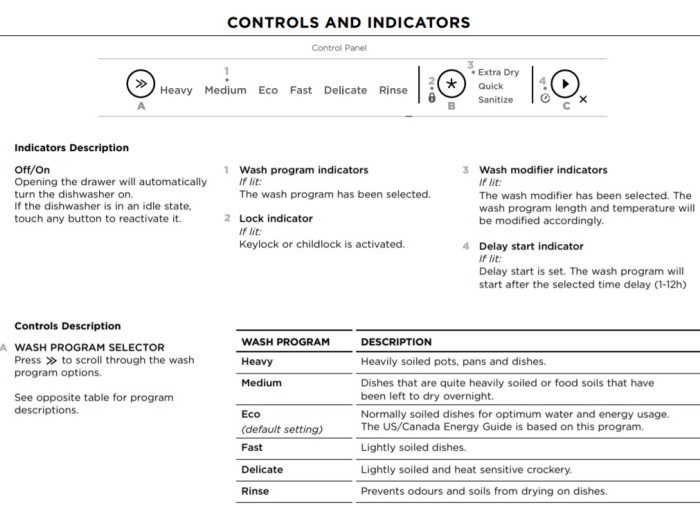
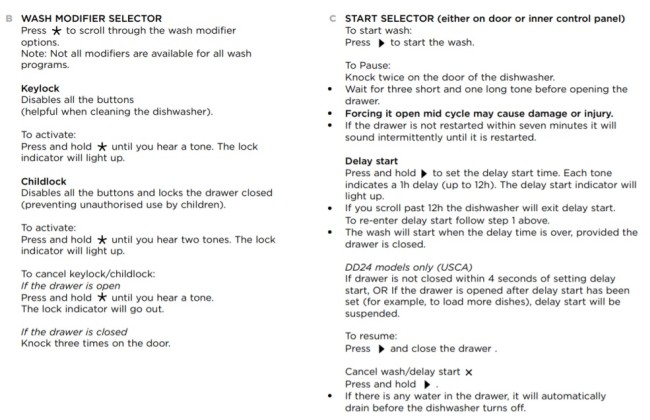
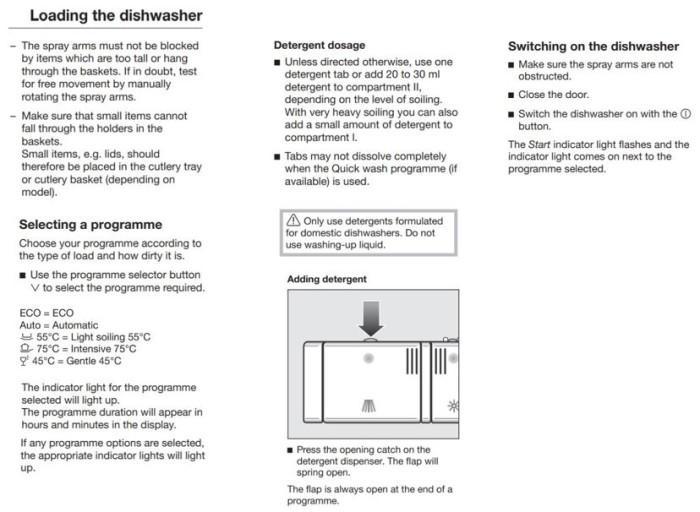
DISHWASHER (SCULLERY)
The dishwasher is located to the left of the sink. Instructions for use are as follows:
RANGEHOOD (SCULLERY)
- Press the top of the button on the far left to illuminate the area, and press the bottom button to turn the light off.
- Turn the fans on by pressing the top of the button and turn off by pressing the bottom of the button. HI/LO operates the strength of each fan.

MINI FOOD PROCESSOR (SCULLERY)
This is located in the bottom drawer on the far left as you enter into the scullery:
- When food has been placed in the processor, place the lid on the top of the bowl with the raised locking tab facing towards the release lever on the rear column on the motor base. Turn the lid clockwise until the lid locks into place.
- Push the release lever on the rear column of the motor base down onto the raised locking tab of the lid until it locks in place.
- Insert the plug into a power outlet and switch on.
- Press the ON/OFF switch to ON and select either the CHOP or GRIND buttons to start those Press the appropriate button in short bursts. There is no whisk attachment.
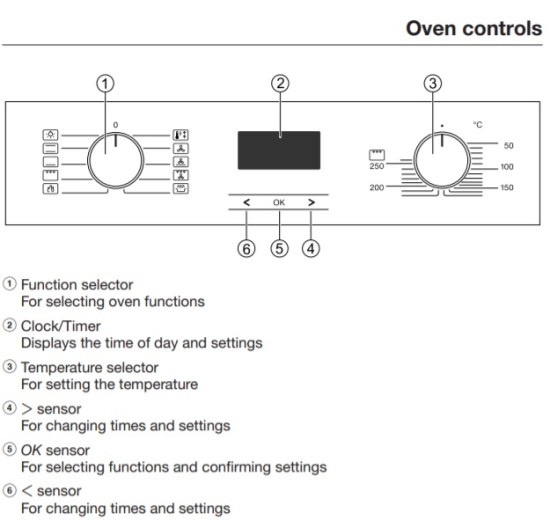
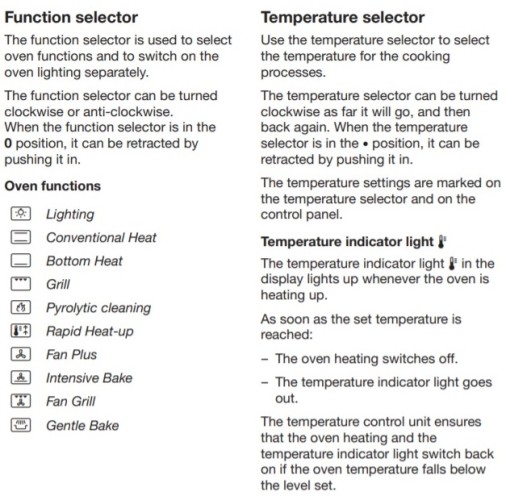
OVEN (SCULLERY)
There are two identical ovens in the scullery for your convenience. Instructions for use are as follows:
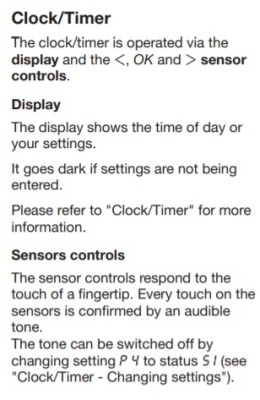
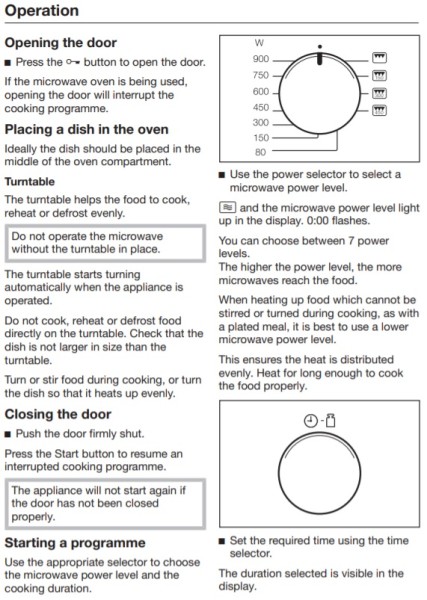
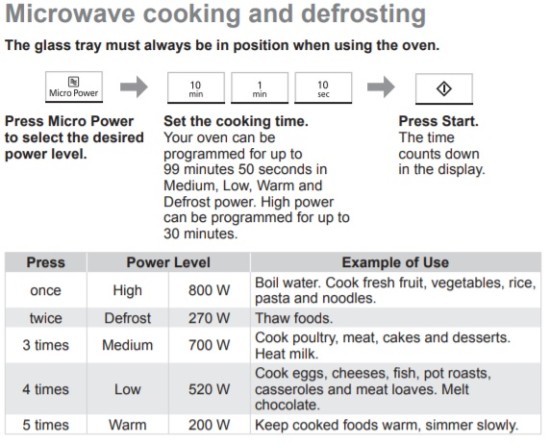
MICROWAVE OVEN (SCULLERY & KITCHEN UTILITY CUPBOARD)
Instructions for use are as follows:
MICROWAVE OVEN (LOFT ROOM)
Instructions for use are as follows:
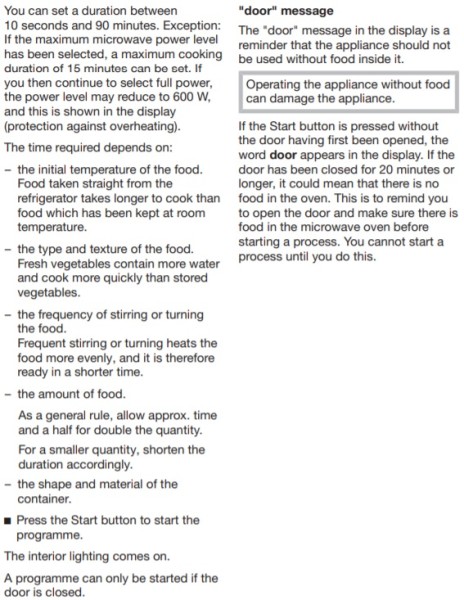
IMPORTANT:
- Do not cook with any metal accessory in the oven.
- The oven will automatically work on High microwave power if a cooking time is entered without a power level being selected.
- While cooking, the glass tray may vibrate. This will not affect the cooking performance.
NESPRESSO COFFEE MACHINE (KITCHEN UTILITY CUPBOARD & LOFT KITCHENETTE)
- Ensure there is plenty of water in the reservoir at the back of the machine and that it is switched on at the wall.
- To turn on the machine press either the Espresso or Lungo button on the top of the machine (the lights will blink for approximately 25 seconds while the machine heats up and will stay steady when it is ready).
- Open the lever on top of the machine and insert a Nespresso capsule (aluminium foil facing towards you).
- Close the lever and place a cup beneath the outlet at the front of the machine.
- To start the machine, press either the Espresso button (on the top left) for 40mls of coffee, or the Lungo button (on the top right) for 110mls of coffee.
- Once the coffee has stopped, open the lever again and the capsule will be expelled into the coffee outlet.
- To determine your own volume of water, repeat steps 1-4 but press and hold either the Espresso or Lungo buttons and until the desired volume is served, then release the button.
- NOTE: The coffee outlet can only hold 5-6 capsules at one time and the used capsules may need to be discarded from the outlet for the machine to work again.
IMPORTANT: If the water volume has been pre-set and you wish to change back to the factory settings, turn the machine off and press and hold down the Lungo button for 5 seconds. The LED lights will blink fast three times to confirm the machine has been reset.
LAUNDRY
DRYING/AIRING CUPBOARD
This is located opposite the laundry sink. If the heating is not on, the switch is located under the very bottom shelf against the back wall.
RETRACTABLE CLOTHES LINE
This is mounted on the inside wall above the door to the laundry. A step stool to reach this can be found in the far cupboard in the laundry next to the appliances. Unlock the clothes line by pulling out the dial and turning it towards you. Extend the line out all the way to the opposite side of the wall and then fix it on to the hooks. Once you have the correct tensions, push the dial in again to lock the lines.
IMPORTANT: This clothes line is only suitable for small or lightweight items. Do not use it for wet, heavy items.
VACUUM CLEANER
This is located in the far cupboard to the left of the appliances.
- Gently remove the stick vacuum from the wall bracket.
- The vacuum has 3 suction modes. If placed on the MAX setting, the vacuum’s battery will not last as long as the other two modes
 or
or  .
.
- Press the red button beneath the handle to turn the vacuum on. Keep your finger on the button for continuous suction.
WASHING MACHINE
Instructions for use are as follows:
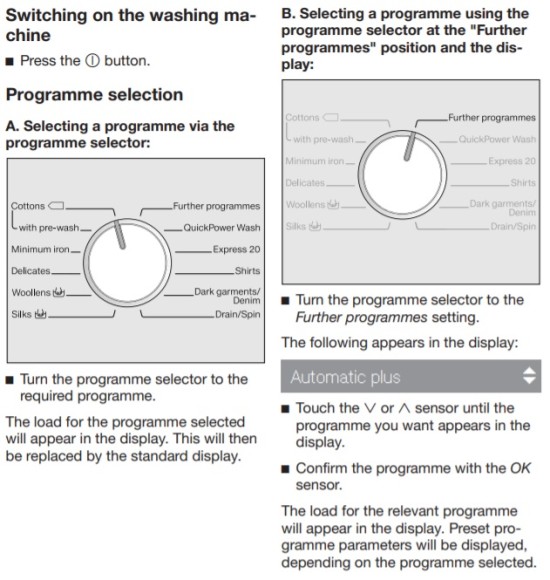
- Pull out the detergent drawer and place one sachet of powder into compartment II.
- Select your desired temperature or spin speed if they differ from a regular cycle.
- Press START/STOP to begin the cycle. The machine will automatically switch off 15 minutes after the end of each cycle.
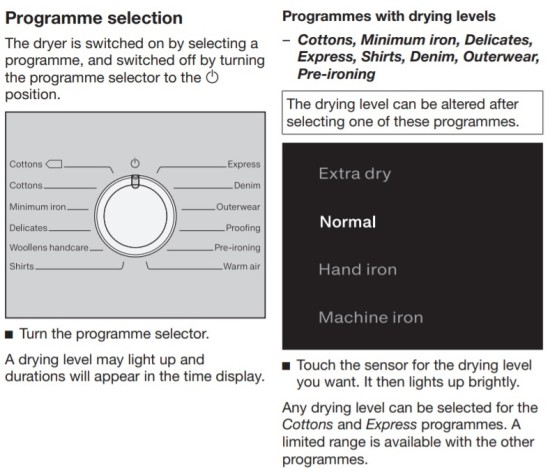
TUMBLE DRYER
- Open the door and check the lint filters on either side of the drum are clean, and the water reservoir is empty before every load.
- Sort and load items into the dryer drum, ensuring no items are in the way of the door.
- Touch the flashing START/STOP on the display to start the cycle when your desired drying programme has been selected.
HOME ENTERTAINMENT
The remote control which is located on the coffee table in the main living area operates the television, a couple of pre-set radio stations, blinds and lighting throughout the house. To listen to your own music, please see Sonos Bluetooth® Speaker instructions to connect your device.
TV (MAIN LIVING ROOM)
The TV is located behind the doors above the gas fireplace.
- To turn the TV on, press the red button on the remote and a Control screen will be displayed as shown below.
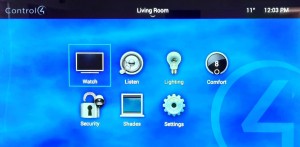
- Use the arrow keys to scroll to Watch, then press the Select button.
- Use the arrow keys to scroll to either Sky or Netflix, then press Select. If watching SKY TV use the remote as you normally would to change channels and adjust the volume.
- If watching Netflix, you will need to sign in to your own account. Please ensure you sign out again before your departure for your own security and for the convenience of future guests. If you need to sign-out a previous user, go to Get Help in their Netflix account (bottom left corner of the screen), then select Sign Out. You should now be able to enter your own account details when signing back in.
- To go back to the Control display screen, press the red button again.
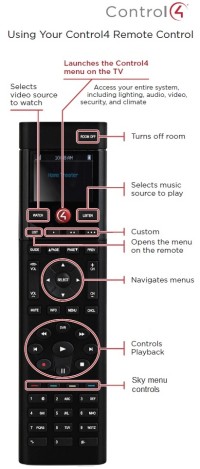
PRE-PROGRAMMED RADIO STATIONS
- In the Control display screen, press Listen on the remote control, then select Living Sonos. Two radio stations have been pre-programmed – Brian FM Alexandra is classic pop and rock and George FM is dance and electronic music.
OTHER REMOTE OPTIONS
Blinds (Shades) and lighting can also be operated by selecting the options on the display. However, for heating (Comfort), please contact Reception for it to be adjusted remotely.
TV (LOFT ROOM)
- To turn on the TV press on the SKY remote control and use this same remote to adjust the volume and change the TV channels.
- To turn off the TV press again.
OFFICE PRINTER (LEFT SIDE OF MASTER BEDROOM)
Guests can connect mobile devices to this printer. Please note it only prints in black and white.
- Make sure the plug is switched on at the wall.
- Open and pull down the cover at the front of the printer.
- Insert paper (located in the drawer nearest the printer) and push in the two small side bars to the edges of the paper to keep it level.
- On your mobile device open your Wi-Fi settings.
- From the list of available networks, select the printer name DIRECT-a6-HP M15 LaserJet (while this is selected you will not have access to the internet on your device). If prompted, enter the Wi-Fi Direct password: 12345678.
- Open the document you wish to print and select the Print option (if the mobile device does not support printing, you may need to install the HP ePrint mobile app on your device).
- Select the printer name (as per 5. above).
- After the job is complete, you may need to reconnect back to the local network in order to access the internet again.
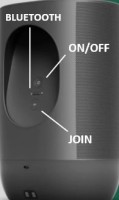
SONOS BLUETOOTH® SPEAKER
This is located in the first cupboard on the left, in front of the kitchen island.
- The speaker will be sitting on its charging base but you can take it off and use the speaker anywhere within the home.
- On the back of the speaker, press to turn it on.
- Turn on your device’s Bluetooth settings, then press and hold the Bluetooth® symbol on the back of the speaker to connect it with your device. When Move (SONOS D68C) is displayed you may also need to press JOIN on the back of the speaker to assist with connection.
- Once your device is paired you can listen to your music via the speaker. You can use the volume and play/pause settings from your own device or use the speaker settings as indicated in the images.
- Please place the speaker back on its charging base when finished.
GARAGE
GARAGE DOOR REMOTE CONTROL
There is a remote control on the house key which will open the garage doors. Pushing the  will open the larger door and the button to the right or that will open the smaller door.
SKI STORAGE
There is a storage cupboard on the left side (as you enter the garage internally) to place skis. On the right as you enter the garage internally is a ski room. If the heating is not on, the switches are located (a) under the seat on the right side as you enter the room and (b) on the far-left wall as you enter the room.
OUTDOORS
CHESSBOARD
The chess pieces will be placed on the board outside unless there is rain or wind – please contact Reception if this is the case and a staff member will come out and install them at your convenience.
DUCKS
We kindly ask guests NOT to encourage the ducks onto the property by feeding them as they will leave a mess on the patio areas and inside the house.
FIREPIT
Please contact Reception if you would like the fire pit prepared and started. Please ensure that the fire is not left unattended and has been completely extinguished after use.
PATIO FURNITURE
If it is raining during your arrival the seat squabs and cushions will not be put out on the patio furniture until the weather improves. Please contact Reception and someone will place these on at your convenience.
TENNIS COURT
Tennis rackets and balls for guest use are located in the second cupboard on the left side as you enter the garage internally. Should you require extra tennis rackets, please contact Reception.
FURTHER INFORMATION
Should you require further assistance during your stay here at Millbrook, please contact Reception on ext 0.
Once again, we hope you enjoy your stay.
